A little knowledge of HTML, CSS, and javascript can add a slider in a WordPress page without employing any WordPress plugins.
A slider requires few lines of javascript codes, CSS, and some Marker up codes that are HTML codes.
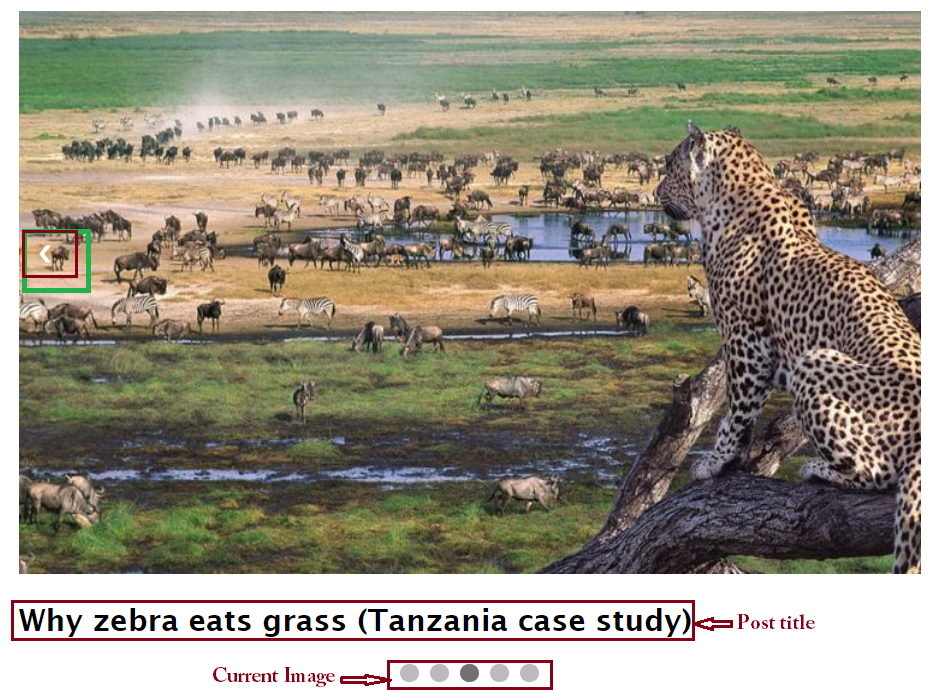
The slider widget integrates the WordPress functions for responsive image thumbnails and the post titles.
It is not necessary at all to buy a carousel plugin.
Just read the entire post to see all the required steps to create a slider that
- Features previous button and next button
- Autorun the images
- Includes bullet
Let’s get started.
Design HTML slider widget.
The first procedure is to write the HTML tags of images, anchors, heading, and div.
Create a container that is going to hold all slider images and heading.
The container uses <div> tag as a widget container.
Introduce a class name to <div> for CSS styling as you will see later.
In short, the complete HTML tags look like this.
1.<div class="slider-images-container">2.<div class="imagesSlide thumb-image fade1">3.<img src="myImage.png">4.<h2>Why africa is so hot?</h2>
5.</div>6.<a class="previous" onclick="plusImage(-1)">❮</a>7.<a class="next" onclick="plusImage(1)">❯</a>8.<div style="text-align: center;">9.<span class="dot" onclick="currentImage(3)"></span>10.</div>11.</div>Code Explanation
Line-2 creates the inner <div> tag that takes images and the post title.
Therefore, put <img> and <h2> altogether for displaying the images and post titles.
The slider that you create should allow a reader to watch the next image or previous.
Line-6 and Line-7 create a left-pointing angle quotation and a right-pointing angle.
The pointing quotes can be referred to as the next button and the previous button.
A reader can slide any image without clicking or touching the previous and next button.
Instead, a reader can choose the image at any position by touching the rounded circle buttons.
The circles help to display the current image a viewer wants to see.
This how they look,
When the reader touches the third circle, the third image becomes the current image to view.
The same process goes through the other circles.
Line-4 builds the circles using the span tag that contains onclick events for javascript.
Every time a user clicks the circle, the number is passed by a function “currentImage“.
If the first circle is clicked, currentImage passes 1
If the second circle is clicked, currentImage passes 2
If the third circle is clicked, currentImage passes 3
If the fourth circle is clicked, currentImage passes 4
Styling slider widget in CSS
As you have seen, the slider has included tags for image, heading, and spans.
Initially, the slider looking is not user-friendly and has bad appearance.
To create a good appearance, you are going to write CSS rules for all tags.
Open style.css file if you have one.
Then write a CSS code that hides all the images and titles by default.
The div container that has images and title is the one with class imagesSlide
In style.css file, its CSS rule is written
.imagesSlide{
display: none;}
Styling next and previous buttons.
Set the background color of the next and previous buttons to black.
Set the color of the button that slides the image to a left side to white.
And apply the same color for the carousel button that slides the images to the right side.
The buttons use anchor tags with classes previous and next.
The complete CSS rules that implement background color, cursor, and pointing quotation color are set as follows.
.previous, .next{cursor: pointer; position: absolute; top: 50%; padding: 16px;margin-top: -22px;color: #fff;font-weight: bold; font-size: 18px; transition: 0.6s ease;border-radius: 0 3px 3px 0;user-select: none;}The CSS code above outputs a white left-pointing angle and right-pointing angle mark.
But the pointing quotations(next and previous) position themselves on the left side.
While next button should be located on the right side.
To move the right-pointing angle mark to the right side of the image add the following CSS rule.
.next{ right: 0;border-radius: 3px 0 0 3px;}Here is the output of the previous and next buttons.

Design circle button to slide current image
The dot circles perform two things.
- Allows the user to view the image at any position in a random way.
- Change the color to strong black for active(current image)
In HTTP created in this post, the circle is created by a <span> tag.
To draw a circle, set border-radius value to 50%.
The border-radius value will reside in dot class, the class of <span>
.dot{
border-radius: 50%;cursor: pointer;height: 15px;width: 15px;margin: 0 2px;background-color: #bbb;display: inline-block;transition: background-color 0.6s ease;}

Every time the circle is selected the color changes light black to dark color.
Create a CSS class that sets a black color for the circle.
The class will be set later on by javascript when the circle is touched or clicked.
I call the class “active”.
.active, .dot:hover { background-color: #717171;}Carousel Javascript codes for sliding images
The main task of the javascript in the carousel is to respond to the clicks of the circles, next button, and previous button.
The clicks slide image and the title of the post either left or right.
Check this carousel javascript code then read its explanation later.
1.<script>var imagesIndex = 1;displayImage(imagesIndex);function currentImage(n){ imagesIndex =n; displayImage(imagesIndex); }function plusImage(n){ imagesIndex = imagesIndex+n;displayImage(imagesIndex);}function displayImage(n){var availableImages = document.getElementsByClassName("imagesSlide");var allDots = document.getElementsByClassName("dot");if(n>availableImages.length){ imagesIndex = 1;}if(n<1){imagesIndex = availableImages.length;}for(var i=0;i<availableImages.length;i++){availableImages[i].style.display = "none";}for(var i=0;i<allDots.length;i++){allDots[i].className = allDots[i].className.replace("active"," ");}availableImages[imagesIndex-1].style.display="block";allDots[imagesIndex-1].className +=" active";}</script>Carousel Code Explaination
In the HTML code section, the previous and next buttons used anchor text.
Both implements onclick event that calls the plusImage function when clicks occur (Line6-7).
When previous is clicked plusImage passes -1 and next image button plusImage passes 1.
The javascript should have the function plusImage to take the values passed by a function.
Line-8 implements plusImage.
But you should set a global variable that acts as an index of the image (Line-2).
Remember that the carousel involves many images and headings.
The index is required to retrieve a specific image and its title.
For example, The index of the first image is 0;
The second image is 1;
The third image is 2;
The fourth image is 3;
The fifth image is 4
The list goes on and on
Hence, Line-9 increments the imagesIndex variable to set the index of a specific image.
The incremented index is passed to displayImage function responsible for displaying an image of a provided index.
Function to display the image
Each div of the image has the class given the name imagesSlide.
Line-13 and Line-14 retrieve all images and dot spans respectively.
The plusImage function increases or reduces imagesIndex variable by 1 or -1.
This means imagesIndex value can be greater than or less than the number of available images something that is not required.
Line-18 and Line-19 set imagesIndex to 1 when imagesIndex is greater the number of carousel images available.
This setting will start showing the first image.
And also, when imagesIndex is less than one, the imagesIndex is set to the number of carousel images.
This setting will start showing the last image.
Line-27 displays the image and its title.
Line-28 set circle a black color when clicked.
Retrieve WordPress posts and thumbnails for a slider.
This is the complete code to add a slider in WordPress.
The code has the addition of the WordPress function in the HTML section.
The explanation is taking lines 3, 5, 7, 8, 10, 13, 17, 25, and 26.
<div class="slider-images-container"><!--Set post control start from zero--> <?php $postIndex = 0; if(have_posts()):?>;<!--Loop out both post title, thumbnail and the index--><?php while(have_posts() && $postIndex<5): the_post();?><div class="imagesSlide thumb-image fade1"><?php if(has_post_thumbnail()):?> <?php the_post_thumbnail();?><?php endif;?><h2><?php the_title();?></h2></div><?php $postIndex++;?><?php endwhile;?><?php endif;?><!--reset post to be used in another loop--> <?php wp_reset_postdata();?> <a class="previous" onclick="plusImage(-1)">❮</a><a class="next" onclick="plusImage(1)">❯</a> <!--start a new loop--><div style="text-align: center;"><!--Display the circles five times--><?php for($i=0;$i<5;$i++):?><span class="dot" onclick="currentImage(<?php echo $i+1;?>)"></span><?php endfor;?> </div></div>Again, the slider is going to contain five images and post titles.
Line-3 set the variable $postIndex to 0 for controlling the number of posts to be retrieved.
But also line-3 checks the availability of posts.
Line-5 creates a loop to iterates the blog posts and $postIndex is set to less than 5.
This iterates five posts only.
Line-8 retrieves post image thumbnail if it has one.
Line-10 display the title of the post.
Line-17 reset the posts to zero.
Line-25 creates a for loop that draws five dots.
Each dot has currentImage function in which it passes some values.
These values are 1 for the first dot, 2 for the second dot, 3 for the third dot, and so on.
Conclusion
To add a carousel in WordPress without a plugin, the first thing is to write the HTML mark-up codes for the images that has the same class.
The images should include the previous button and next button to slide the images left or right.
The button must implement a javascript onclick event.
The last feature is to add a WordPress while loop that takes the images of five posts.
The images are the ones to be included in the slider.