You have designed a theme’s HTML layout but that doesn’t make up a complete theme.
A design has to be implemented with WordPress functions.
WordPress functions enable the design to be populated by the posts created by authors.
So, this part shows how to integrate WordPress functions in the bootstrap HTML page that I designed in part I.
To create a responsive WordPress theme from scratch a page dynamism is essential.
But that page I created is static.
It doesn’t retrieve the information like blog posts, categories, author names from the WordPress database.
So, to make a dynamic page, I am going to use some WordPress functions to display.
- Blog posts
- Author name
- Date of the post
- Post Category
- Link of the post
- Post thumbnail
- Post title
- Excerpt (post description)
- Recent posts on the sidebar
- Continue Reading button (To read the whole article)
The WordPress architecture retrieves data by special filenames that the WordPress framework knows.
Therefore, I am going to create 17 PHP WordPress files that integrate bootstrap and WordPress.
Let’s dive in.
Create an empty folder for storing all PHP WordPress files.
Create a theme folder in the WordPress folder, it is where all bootstrap folders and the WordPress files stay.
To create this folder,
Open xampp folder in local drive C then open htdocs then select the folder of WordPress.
I didn’t rename my WordPress folder but It is good if you renamed to your desired name.
Once you are inside the WordPress folder, you will see various files and other folders including the wp-content folder.
Open wp-content directory.
Then, navigate to the themes folder, this is where there are other pre-installed WordPress themes.
The theme that comes with WordPress includes…….
- Twentynineteen
- Twentyseventeen
- Twentysixteen
These themes are the folders, So I should create a new folder as my theme.
Therefore, create an empty folder in the themes directory.
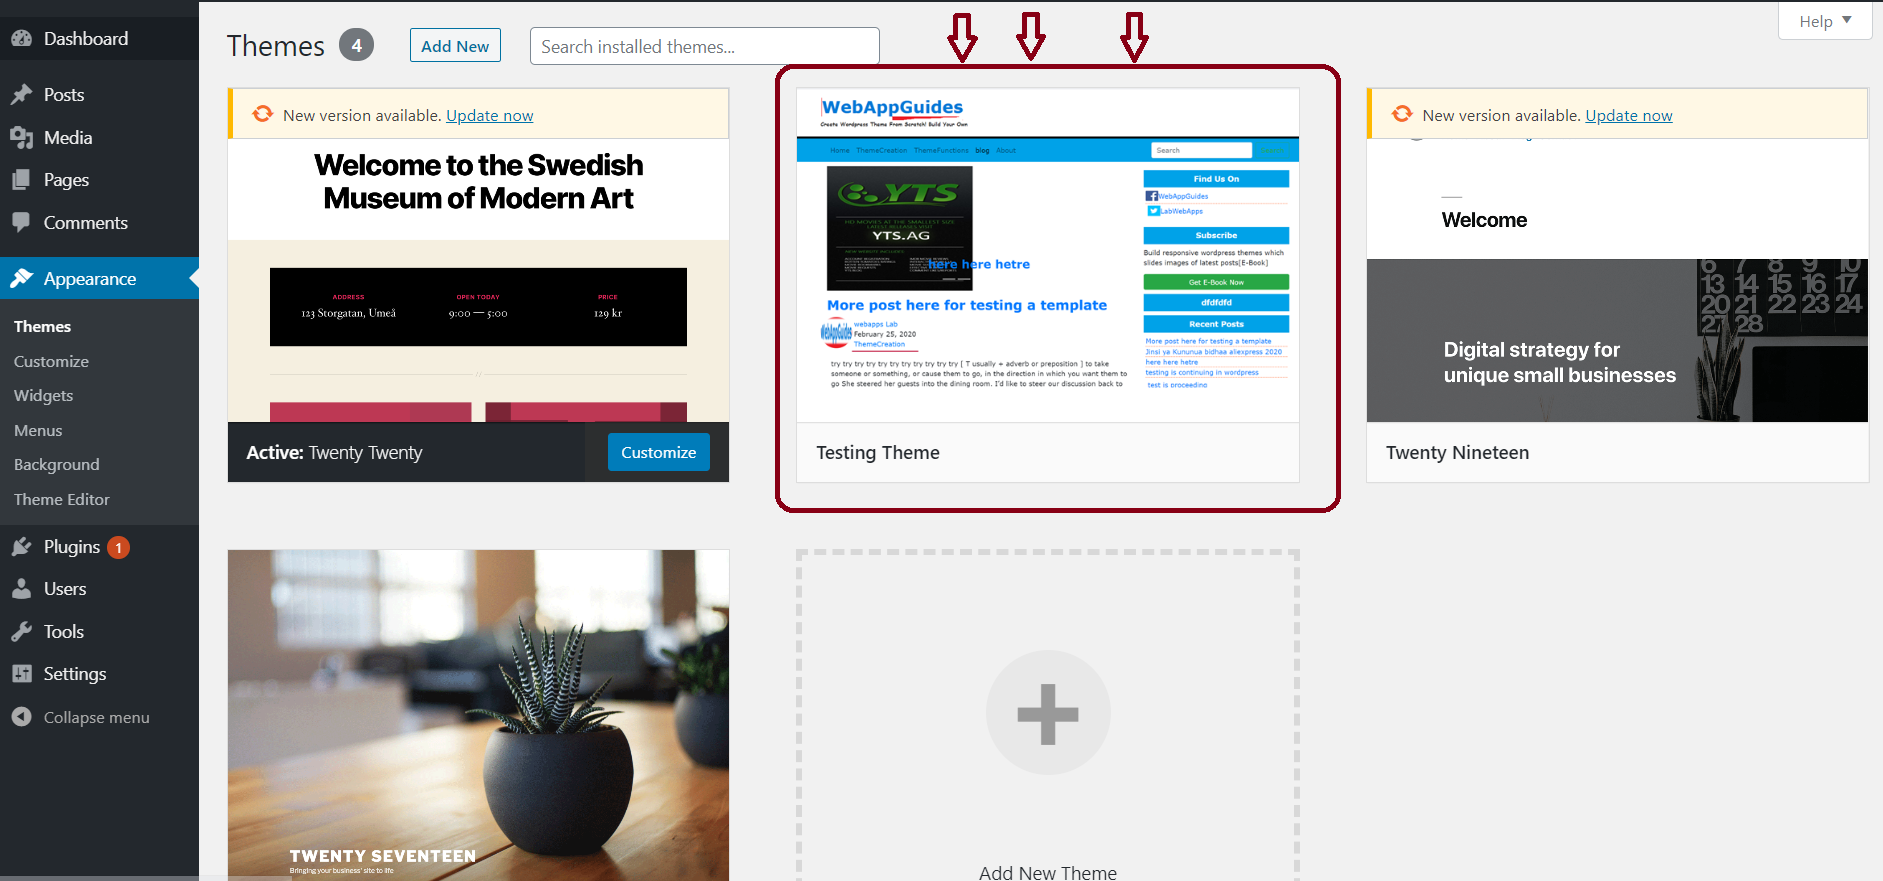
I called my WordPress theme folder “testingtheme”.
I will copy all folders and files from my desktop to a testingtheme folder.
The folders include bootstrap folders and HTML files that I designed in the previous part of creating a responsive WordPress theme from scratch.
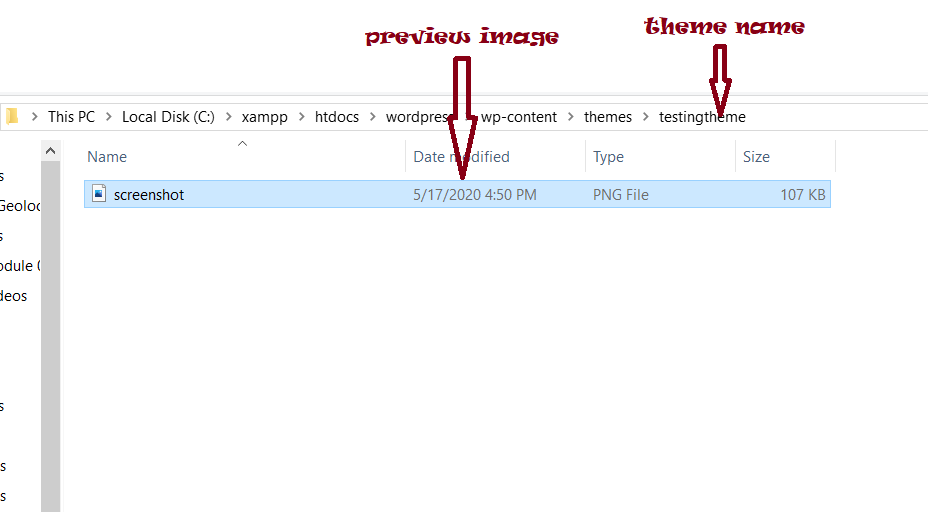
Create theme Screenshot as theme image preview
In the WordPress admin dashboard menu, there is an Appearance menu.
The appearance menu has a theme option that help to install a WordPress template.
Choose a theme, this takes you to the page which lets you select a theme for installing.
Each theme has an image that shows the home page layout of the theme.
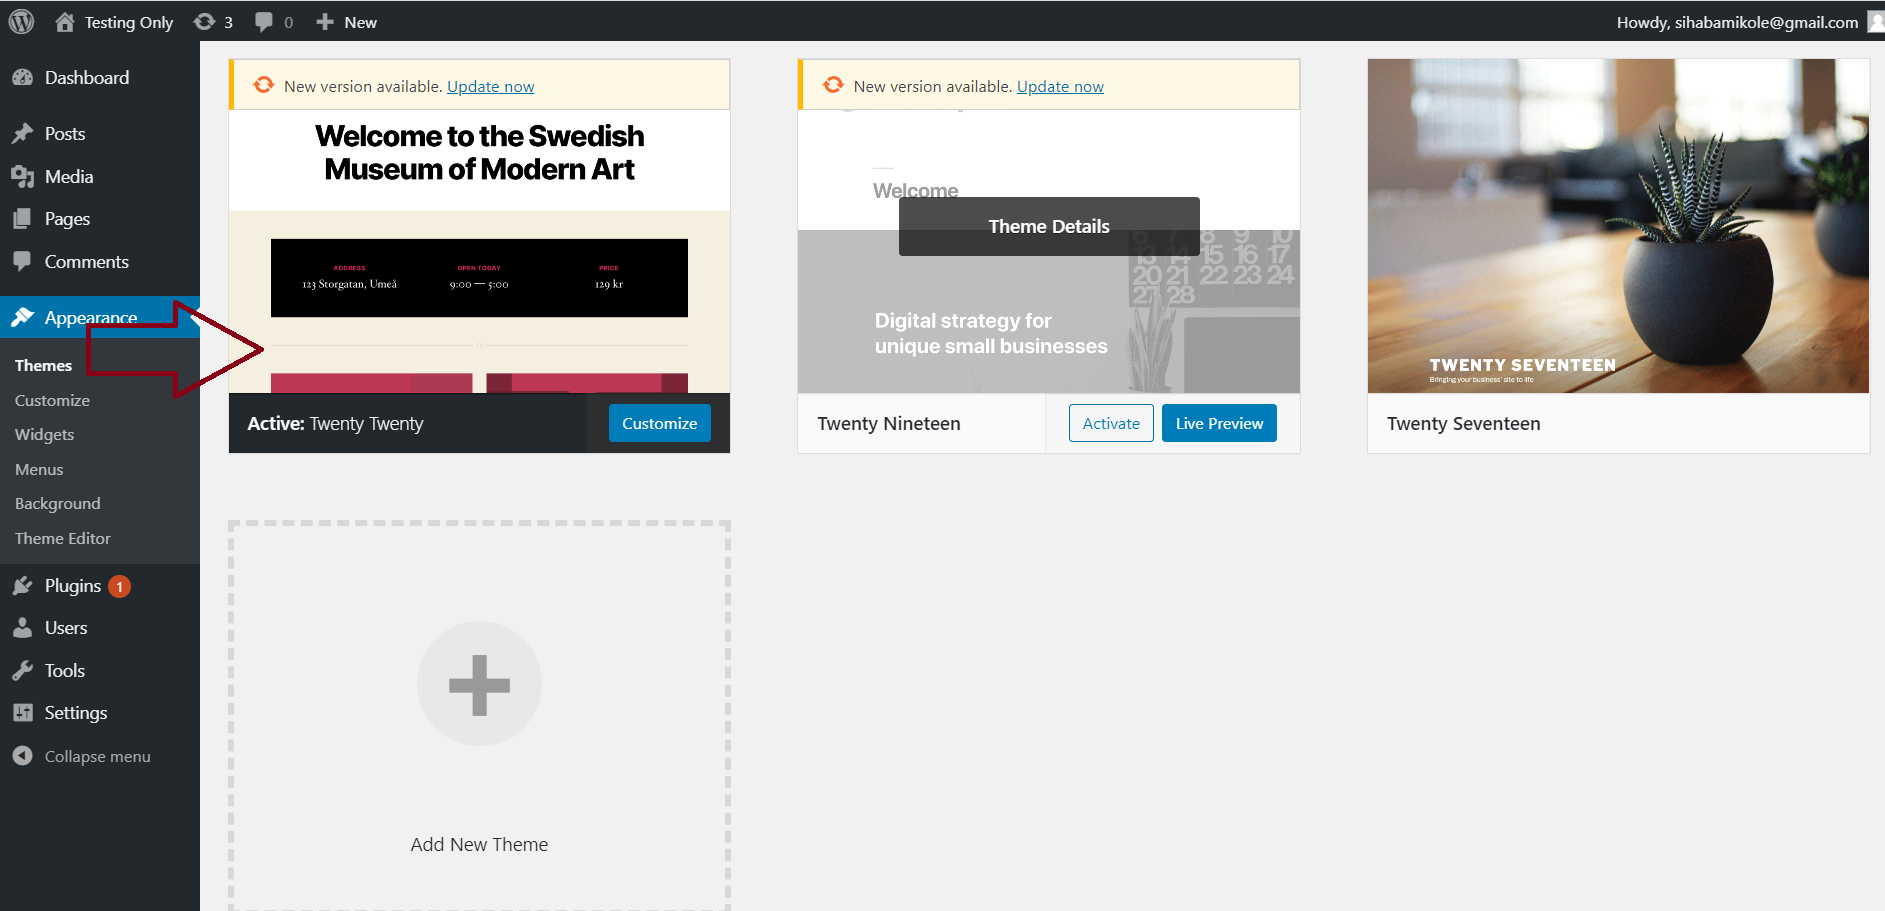
I want my theme to have a preview image.
Therefore I will screenshot my previous design then I rename the image to the screenshot.
Remember to rename the image to the screenshot.
That is the name WordPress understands otherwise WordPress won’t display your theme preview.
Save a screenshot to your theme folder (my theme folder name is “testingtheme”).
Edit style.css to give theme description and name
Style.css is a file for styling a theme and also for giving names and other description which are displayed in themes preview details.
Open appearance-> themes.
You will see an alert message saying “Broken Themes. The following themes are installed but incomplete”, followed name of the same and description”

And when I copy style.css to my testingtheme folder, a new message appears.
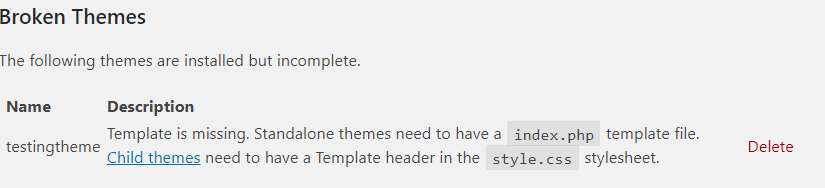
This happens because I didn’t put in the theme folder style.css which contains the theme name,
The theme description and responsive theme CSS codes and also there is no index.php.
Index.php is a very important WordPress file, you will see its details later on.
For now, just open the style.css file.
Enter the following codes on the top part of the style.css
/*
Theme Name: Testing Theme
Author: WebAppLabs255
Author URI:https://webappguides.com
Description: Build WordPress Theme From Scratch by Your own Hand.
version:1.0
*/
Description of the Codes.
Theme Name: write your preferred name, The name become a theme name.
Author: The name of the WordPress theme developer.
Author URI: The link to the developer website.
Description: Here, provide the information which describes a theme.
Now, it is time to create a PHP file that displays blog content.
Edit index.html to index.php
In the Create Responsive WordPress theme part I, I just designed an HTML page structure for using it later in the blog.
The designed HTML page needs to be integrated with WordPress functions.
But WordPress is the PHP framework, So, it can’t work without PHP files.
Therefore, change index.html to index.php.
To change index.html, open your theme folder and right click then select open with code.
Remember, I use the visual studio code editor to code my theme.
On the left sidebar of Visual Studio code, you will see index.html.
Rename index.html to index.php then save it.
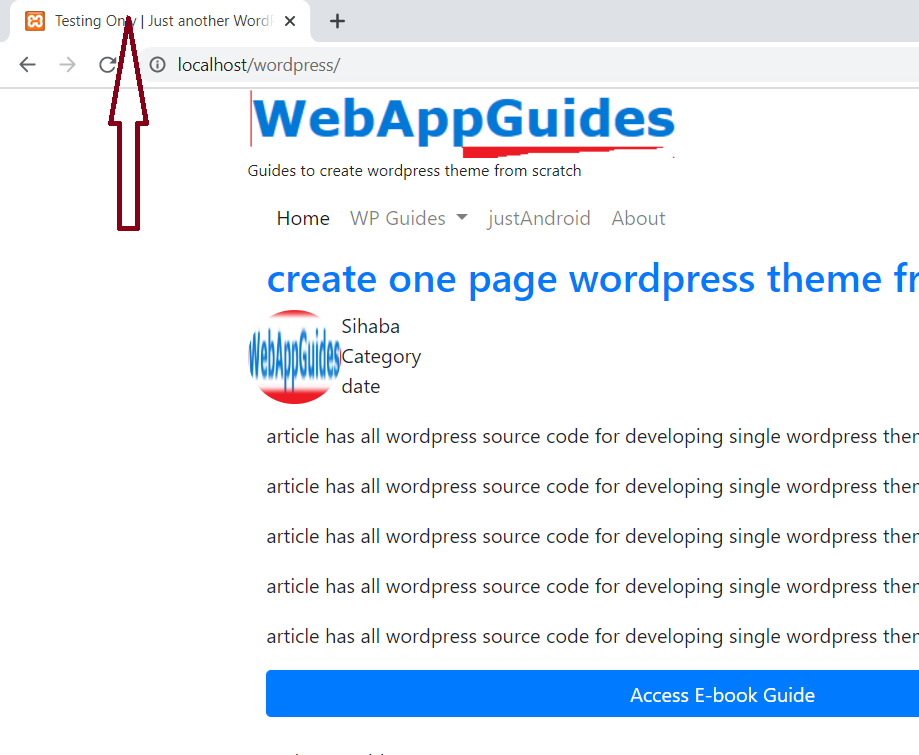
Open the browser, and then, enter the admin dashboard page which is http://localhost/wordpress/wp-admin
On the dashboard menu, Go to Appearance then click a theme.
The page showing all themes available will display all themes.
Now, you will see your theme screenshot.
My screenshot is a page that I designed in part one.
Since the WordPress framework is able to show my theme screenshot, this means everything is working fine.
Therefore, I can activate the theme now.
Just hover the cursor to a preview image of a theme then select activate.
On the top of the Dashboard there is the name of the blog, click it to check the appearance of your blog on a browser.
The link to my website is http://localhost/wordpress .
After activating my custom blog, the blog looking has changed.
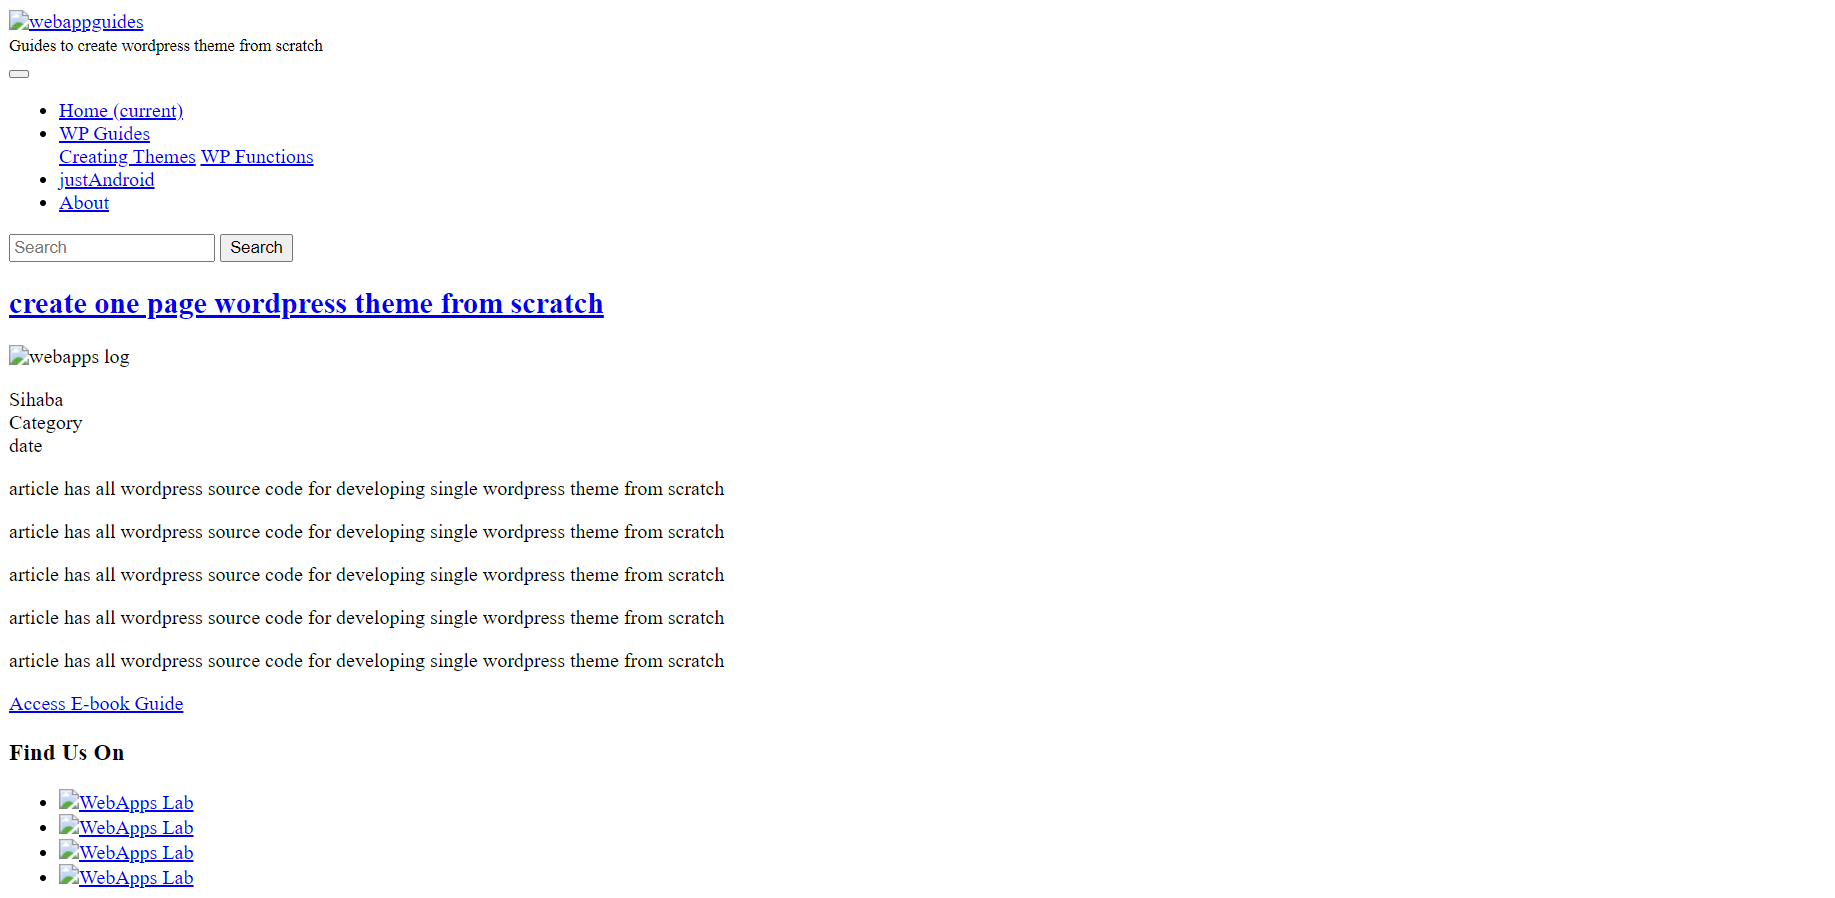
The looking is very different from the page I designed in “create responsive WordPress theme from scratch part I”
The reason is, I didn’t create WordPress functions in index.php that integrates bootstrap with WordPress.
You know, to create a responsive WordPress theme from scratch without a bootstrap framework is time-consuming.
So, I will spend a lot of time on this part to integrate bootstrap with WordPress.
Let’s get in deeply …….
Insert Various WordPress Functions Inside index.php
At first, call a function needed to create a link for accessing all styling files including bootstrap.min.css.
Then, you will create a function that returns blog names and blog description.
Now do the following.
Open index.php and navigate to <head> tag section.
The head tag I created in part one had the following codes.
<head>
<link rel= "stylesheet" href = "style.css">
<link rel= "stylesheet" href= "bootstrap/css/bootstrap.min.css">
<meta name="viewport" content="width=device-width, initial-scale=1">
<title>TestingTheme-Create Responsive WordPress Theme From Scratch </title>
</head>
WordPress failed to retrieve “style.css” and “bootstrap.min.css” files.
These are the files that make the page have good looking.
Now, Edit the above code to include WordPress functions to add the stylesheet.
The functions to add stylesheet are
- bloginfo(‘stylesheet_url’)
- get_template_directory_uri()
How to add stylesheet by bloginfo(‘stylesheet’) function
Head over to the line for style.css that is <link rel= "stylesheet" href = "style.css">
Under the “href” attribute, delete style.css without deleting quotation marks.
After deleting style.css, Write the following code.
<?php bloginfo(‘stylesheet_url’);?>
The new line for the stylesheet will be changed as follow.
<link rel= "stylesheet" href = "<?php bloginfo(‘stylesheet_url’);?>">
How to add bootstrap stylesheet by get_template_directory_uri() function
Head over to the line forbootstrap.min.css that is <link rel= "stylesheet" href= "bootstrap/css/bootstrap.min.css">
Add the get_template_directory_uri() after opening the quotation then put slash(/).
Here how to do it.
<link rel= "stylesheet" href= "<?php echo get_template_directory_uri();?> /bootstrap/css/bootstrap.min.css">
Save and open a browser to view a blog.
A previous design will appear as it was designed earlier.
To get this view, some codes lines require get_template_directory_uri() too.
Near the end of the file, there are <script> tags.
These tags are the following.
<script src="bootstrap/js/bootstrap.min.js"></script>
<script src="jquery/jquery-3.4.1.min.js"></script>
<script src="bootstrap/js/bootstrap.bundle.js"></script>
<script src="js/popper.min.js"></script>
These are scripts that I am going to add <?php echo get_template_directory_uri();?>/
Add <?php echo get_template_directory_uri();?>/ after opening quotation mark on each scripts.
If you have added that codes correctly, then new codes become,
<script src="<?php echo get_template_directory_uri();?>/bootstrap/js/bootstrap.min.js”></script>
<script src="<?php echo get_template_directory_uri();?>/jquery/jquery-3.4.1.min.js"></script>
<script src="<?php echo get_template_directory_uri();?>/bootstrap/js/bootstrap.bundle.js"></script>
<script src="<?php echo get_template_directory_uri();?>/js/popper.min.js"></script>
I’m done with this.
But you must make everything a dynamic.
So Create other functions to retrieve various contents.
Implement a WordPress function to get the site title
A WordPress function to get the title of the site is bloginfo(‘name’).
bloginfo() function passes specific parameters that the WordPress system understands.
Since I want the name of the blog, A string ‘name’ is passed into a bloginfo function.
Therefore, Edit <title> tag element by implementing bloginfo('name')
The question is, How to implement it?
Go back inside the <head> tag, there is <title> tag, I want this tag to show the blog name and blog description.
The WordPress function for showing blog name is bloginfo(‘name’) and for a blog description is bloginfo(‘description’)
The title tag will look like ……
<title><?php bloginfo(‘name’); ?> | <?php bloginfo(‘description’);?> </title>
The browser title bar will show the blog name and description after page reloading.
Set up blog name and description in the header
This time you are going to set up the header. The header displays the name of the blog and description.
The blog description is below a site title. All elements start from the left side of the header.
My blog description was “Just another WordPress site”.
 Remember to divide the body tag into three sections which are a header, main body, and footer.
My website title is “test Only”.
But here, you see my title is WebAppGudes. It is just an image of one of the websites I run.
In my <header> tag there were the following codes.
<header>
<div class="container">
<div class="row">
<a href="index1.html"><img src="<?php echo get_template_directory_uri();?>/images/web_app_icon.png" alt="webappsguide"></a>
</div><!--header row-->
<div class="row">
<small>Create wordpress theme from scratch</small>
</div>
</div><!--header container-->
</header>
Check out this code line.
<img src="<?php echo get_template_directory_uri();?>/images/web_app_icon.png" alt="webappsguide">.
Replace webappsguide with <?php bloginfo(‘name’);?>; , this function takes the name of your blog.
Then edit this code.
<small>Create wordpress theme from scratch</small>
Replace “Create a WordPress theme from scratch” with
<?php bloginfo(‘description’);?>
The complete codes in the header section will be …..
<header>
<div class="container">
<div class="row">
<a href="index1.html"><img src="
<?php echo get_template_directory_uri();?>/images/web_app_icon.png" alt="<?php bloginfo('name');?>"></a>
</div><!--header row-->
<div class="row">
<small><?php bloginfo('description');?> </small>
</div>
</div><!--header container-->
</header>
Save and reload your WordPress site.
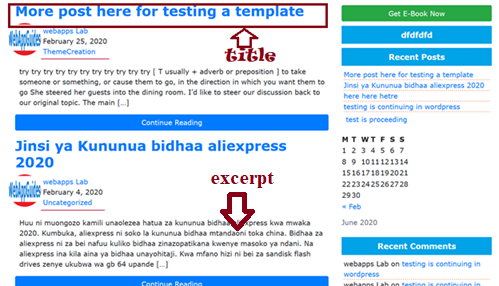
Implement WordPress function to get posts titles
This time you will call a function that retrieves each post title of the blog.
The WordPress function for getting titles of the posts is the_title() and get_the_title()
Since a site can have many posts, a loop is needed to iterate each post title.
So, you must create a loop to access all blog posts.
Use a while loop to get the title of the posts.
Write a loop below <div class=”col-md-8″> , the first column.
The column holds the following elements.
<div class="row">
<div class="col-md-12">
<!--loop here-->
<article class="post">
<h2><a href="#">create one page wordpress theme from scratch</a></h2>
<div class="row meta">
<img src="<?php echo get_template_directory_uri();?>
/images/webapp logo.PNG" alt="webapps log" style="border-radius: 50%;"
width="75px" height="75px">
<p class="author">
Sihaba<br>
Category<br>
date<br>
</p><!--author-->
</div>
<p> article has all wordpress source code
for developing single wordpress theme from scratch</p>
<a href="#con" class="btn btn-primary" style="width: 100%;">Access E-book Guide</a>
</article>
</div>
</div>
Therefore, a while should be written above <div class="row">
Here’s how to to get post titles.
First, check if the blog has the posts.
<?php if(have_posts()):?>
If it is true the blog contains posts.
Access all posts using a while loop.
<?php while(have_posts()): the_posts();?>
Edit <h2><a href="#">create one page wordpress theme from scratch</a></h2> to add the_title() function.
Therefore, delete “create one page wordpress theme from scratch".
Replace a deleted statement with the following codes.
<?php the_title();?>
This new line is
<h2><a href="#"><?php the_title();?></a></h2>
Getting permalink of a post within a loop.
A WordPress function for getting a link of a post is the_permalink().
I want to put the link on the title so that a user can click to read the whole article.
In this code <h2><a href="#"><?php the_title();?></a></h2>, Edit attribute of anchor tag href.
So, replace # with <?php the_permalink();?>
Now the new line is . . . . .
<h2><a href="<?php the_permalink();?>"><?php the_title();?></a></h2>
Get the author’s name and the date.
There is a section that will show the name of the author of the post inside the article.
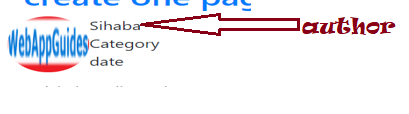
Sometimes a blog can have more than one author.
WordPress has a function that can show a person’s name who created a post.
That function is the_author()
In index.php, Edit the following codes which are inside
<p class="author"></p>
<p class="author">
Sihaba<br>
Category<br>
date<br>
</p><!--author-->
Replace Sihaba with <?php the_author();?>
Replace date with <?php the_date();?>
The complete codes now become.
<p class="author"></p>
<p class="author">
<?php the_author();?><br>
Category<br>
<?php the_date();?><br>
</p><!--author-->
Save and reload the WordPress page on the browser.
Call WordPress function for an excerpt to display post summary
the_excerpt() is a WordPress that displays a brief description of the post.
The excerpt length can be reduced or increased by creating a function in function.php
A function returns the number of words you want as a summary.
In this project, I will use a WordPress default setting for an excerpt.
Set the excerpt below the line.
</p><!--author-->
Therefore, write the following WordPress PHP code.
<p><?php the_excerpt();?></p>
Hence, replace <p> article has all WordPress source code for developing a single WordPress theme from scratch</p>
with <p><?php the_excerpt();?></p>
Create a continue reading button.
Create a button to allow a reader of the article to view the whole article.
Use the bootstrap button class of btn and btn-primary to set a link blue button.
<a href=”<?php the_permalink();?>” class=”btn btn-primary” style=”width: 100%;”>Continue Reading</a>
I set the button width to occupy the entire space.
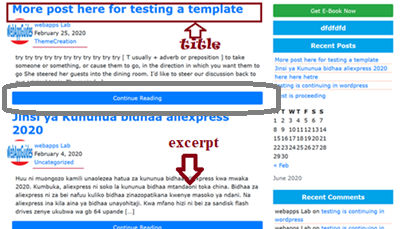
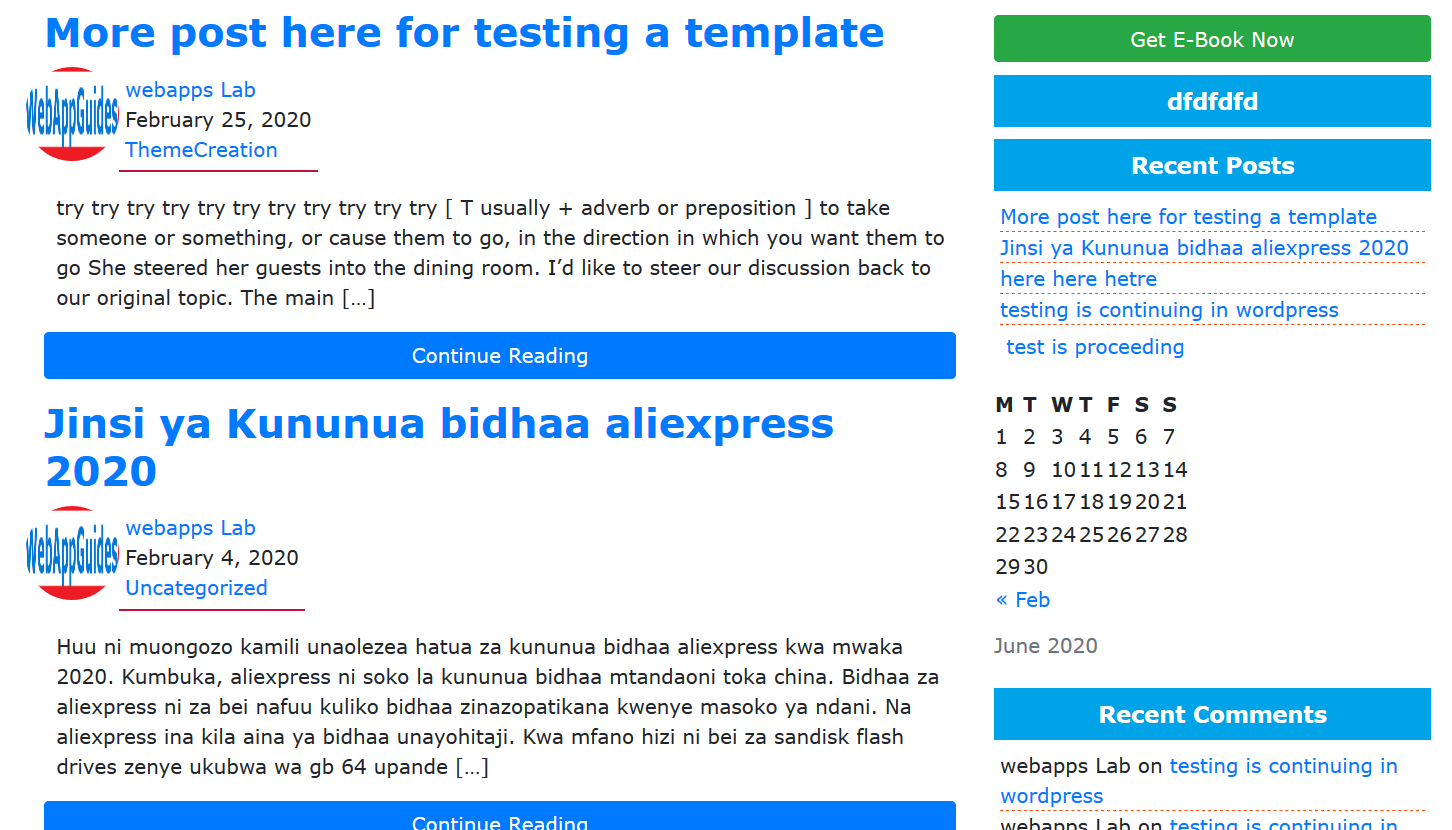
Reload a page and you will all posts title, author, and reading button
CONCLUSION
The responsive theme is not complete as it does not implement all the WordPress PHP files. I will complete this in part iii. keep coming for updates.